


Preserving the harvest really starts in spring time with garden planning.
Which is what I am in the thick of right now!
Roma style and paste tomatoes are a big part of our fall harvest every year. We can them, freeze them, eat our weight in them fresh, and even dehydrate them.
Making tomato leather was a new tomato preservation method that I tried last year. We had an incredible crop of tomatoes, an abundance, and one way or another I was determined to preserve every last one of them…
My tomato leather turned out great! It is something I plan on adding to my yearly tomato repertoire.
And I will tell you exactly how I did it!
Everything You Ever Wanted to Know About Tomato Leather:
-step by step instructions of how to make tomato leather
-why I didn’t add anything except tomatoes to my tomato leather
-how to reconstitute tomato leather
-lots of ideas on how to actually use tomato leather
-how to store tomato leather
Tomato leather is just like regular fruit leather (if you don’t know what this is, think fruit roll-up) but made from tomato sauce. Unlike say, a luscious blueberry or sweet apple leather, this tomato leather isn’t meant to be eaten straight-up. Although you can, and I think people do…
I’ve heard that some people use square of tomato leather on a BLT sandwich.
Interesting. And a little weird.
I first saw the idea for tomato leather in this book: Food Drying with an Attitude, by Mary T. Bell. How can you not love a book about dehydrating food with at title like that! And actually, it has become one of my favorite dehydrating books. Click on the picture to find it at Amazon (usually for under $10)!


I looked at several recipes before making my tomato leather. Most of them called for extra ingredients, which I wasn’t interested in, and frankly didn’t think were needed.
I didn’t add anything except tomatoes, and here’s why:
Honey– now, I add honey to my sweet fruit leathers, but that is for more pliability and a sweet taste, which isn’t an issue for my tomato leather.
Apple Sauce– I think people add this to make it hold together, but as long as you cook the tomato sauce down and spread it thick enough on the tray, this shouldn’t be a problem.
Lemon Juice– maybe people add it to prevent the leather from turning brown, but cooking it down will stop the enzymatic action of that, so it isn’t necessary. Tomatoes are plenty acidic and don’t need the lemon taste-wise, and there is no risk of botulism here, so lemon isn’t needed for that.
Salt– yes it is a preservative, but so is dehydrating, and it isn’t added to sweet fruit leathers… plus, I prefer to add salt when I reconstitute the leather and cook with it.
Spoiler Alert:
My plain, nothing-but-tomato leather came out just wonderfully! It held together well, came off of the fruit leather tray easily, is pliable, and 7+ months later it hasn’t turned brown. And it tastes great of course.
I bet right now you are thinking that tomato leather sounds like a pretty cool idea.
I bet you are also wondering what in the world you would actually do with it.
While I always appreciate tutorials for great preservation techniques, what I love even more are practical uses for their products. I don’t want to make tomato leather if I can’t think of any ways to use it!
Many uses of tomato leather center around rehydrating it first, which is very simple and quick.
General Reconstitution Guidelines
Cut or rip tomato leather into pieces that will fit into your pot or pan.
Start with enough water to just cover the leather pieces. It is easier to add water if you want a looser sauce, than to boil the extra water out if you’ve added too much.
Simmer water and leather together on medium-low heat for 5-10 minutes.
What to Do with Tomato Leather
Marinara Sauce
In a pan sauté onion, garlic, shredded carrot and dried or fresh herbs in olive oil. When everything is cooked, add in your reconstituted sauce and cook for several more minutes.
Pizza Sauce
Place tomato leather into a small amount of boiling water. Add dried Italian seasoning and garlic for instant pizza sauce.
Tomato Paste
Add tomato leather pieces to the least amount of hot water possible. Better yet if you can pulverize the leather in a blender or food processor first.
Chili, Soups & Stews
Add squares of tomato leather directly to your pot of simmering chili, soup, or stew in order to thicken it and add extra tomato flavor. Try some in my Italian Venison Stew!
Tomato Cream Sauce
Sauté onion and garlic until softened, then add in heavy cream or half and half and add tomato leather directly to it; simmer very low until leather has softened.
Tomato Sprinkles
Cut the leather into fine strips or whirl in the food processor or blender to make a fine crumb. Use for a topping on eggs, a green salad or even broccoli. Add some to chicken with pesto, or use in veggie dips. Roll it up in a pork or beef roulade. How about on a turkey sandwich or wrap? It is great in deviled eggs, crock pot recipes, vinaigrette dressings, and in hamburger patties. Tomato basil bread, anyone?
How to Make Tomato Leather
A paste variety tomato (see my guide to choosing the best tomato varieties!) is best, but any tomato except for cherry should work for leather.
Step 1: De-Seed
The best way to cut a tomato for seeding depends on the type of tomato. For round tomatoes, cut them in half at the equator, separating them into top and bottom halves to expose the seed pockets. For roma and paste varieties cut them longitudinally; usually at the stem end of the tomato they appear just slightly wider one direction, which is the direction I cut through. I scoop the seeds out with the handle of a spoon and then cut out the stem nubbin. Yes, stem nubbin.

Step 2: Puree
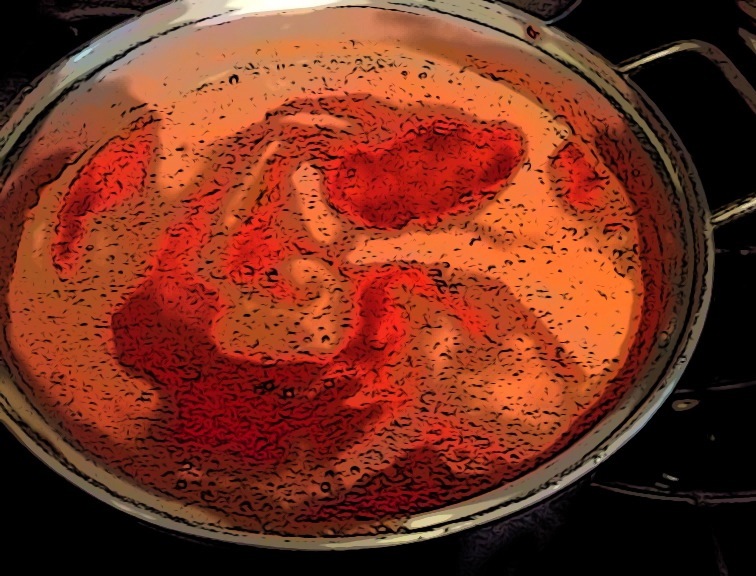
The seeded tomato halves then go into a blender (or food processor) and get whizzed up until smooth. I do not remove the skins because they will be blended up (and they are full of nutrients). Working in batches, eventually I have a pot of pureed tomato! I didn’t puree mine very hard, which you can see from the top picture that there are some seeds and some pieces of skin. Puree yours more, if you’d like.
Step 3: Cook
Simmer the tomatoes for one to two hours, until it is thick and reduced by about half of its original volume. Allow the thick tomato sauce to cool until almost room temperature.

Step 4: Dehydrate
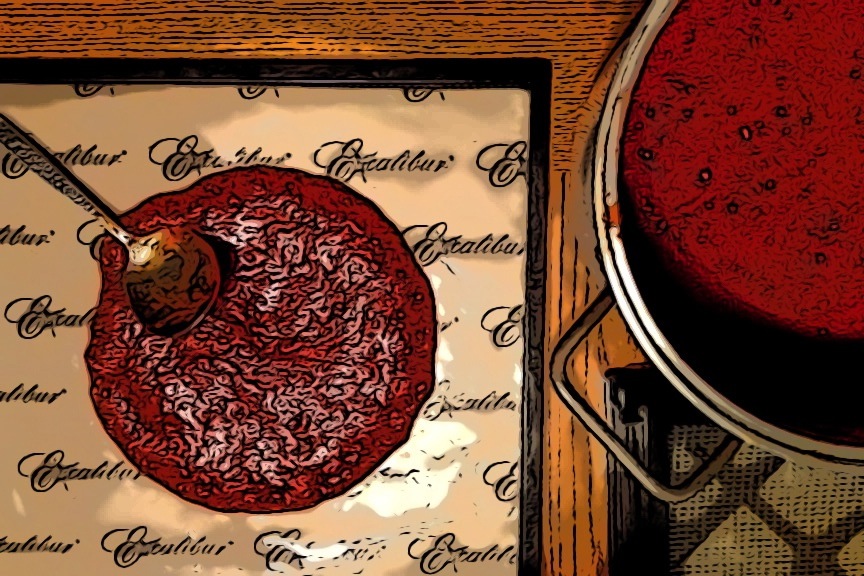
Use a ladle to scoop the tomato sauce onto a fruit leather sheet or tray. You can also use a parchment lined tray.
I did not use any oil or cooking spray on my fruit leather sheets (never do). You might consider it if using parchment or if your dehydrator’s instructions recommend it for fruit leathers.
For my Excalibur Dehydrator I tried several different sauce-spreading methods and found that for my trays lined with Paraflex sheets, the best way was to make a pile of sauce in the center and then gently giggle the tray back and forth to spread it (affiliates). This is what gave me such perfect circles.
If you are using a round or other dehydrator, use a spatula to spread the tomato sauce all around your fruit leather or lined tray.
Dehydrate according to your machine’s setting for fruit leather.
I did not flip the leather at all during the dehydrating.
My tomato leather took about 12 hours, but yours may take more or less depending on how thick it is and the power of your dehydrator. It is done when there are no wet spots left.
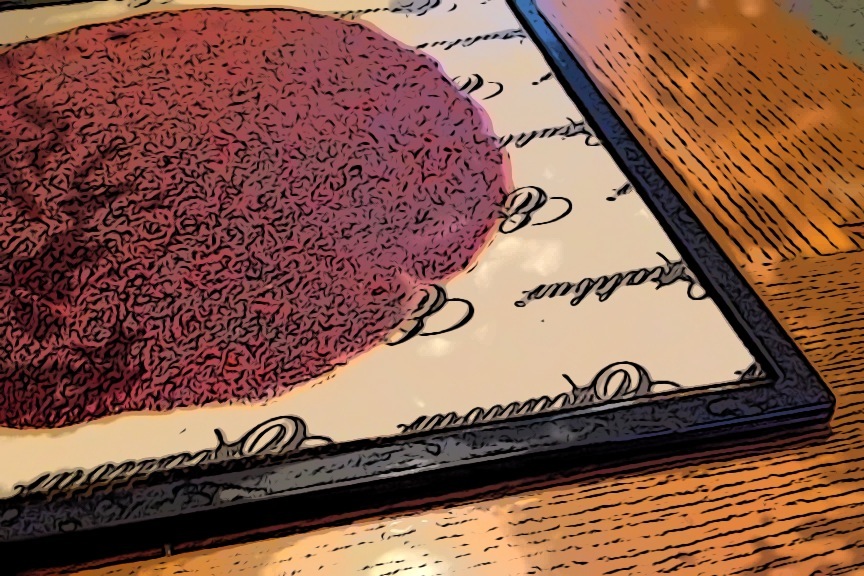
Speaking of thickness, I wanted mine as thick as possible, which ended up being just shy of ¼” thick (wet). By the way, there is a fine line between trying to get a thick layer of sauce on the tray and having sauce spilling off the sides of the tray.
You can attempt to dehydrate in an oven, but it can take a long time (and use a lot of energy). Use a silicon baking mat or parchment paper on your baking pan. Spread the tomato sauce 1/8” thick and bake for 6-12 hours at 150 degrees F (or the lowest setting).
I adore my Excalibur Dehydrator, and am certain that it paid for itself in less than a year. It is easily one of my most essential preserving, homesteading, healthy living tools. I used a round dehydrator for many years before getting an Excalibur, and it was fine for my beginning-dehydrator endeavors, but I really can’t recommend the Excalibur enough!
5. Store
I stacked my dehydrated sauce circles and placed them into a gallon-size zip top freezer bag for storage. I keep them in the pantry with the rest of my dried goods. I just rip off a few pieces off whenever I need some. You can also cut them into squares so they are ready at a moments notice (a clean kitchen scissors is the best tool for the job).
There you have it, just one more way to preserve summer’s bounty!
Do you make tomato leather?
What are your favorite ways to use it up?
This post may contain affiliate links, which means that if you click through them and end up purchasing an item (any item, not necessarily the one I recommended even!) I may receive monetary or other compensation. The price you pay is unaffected by using this link, and buying stuff you were going to get anyways through an affiliate link is a great way to support your favorite blogger and fellow homesteader! Thanks!