
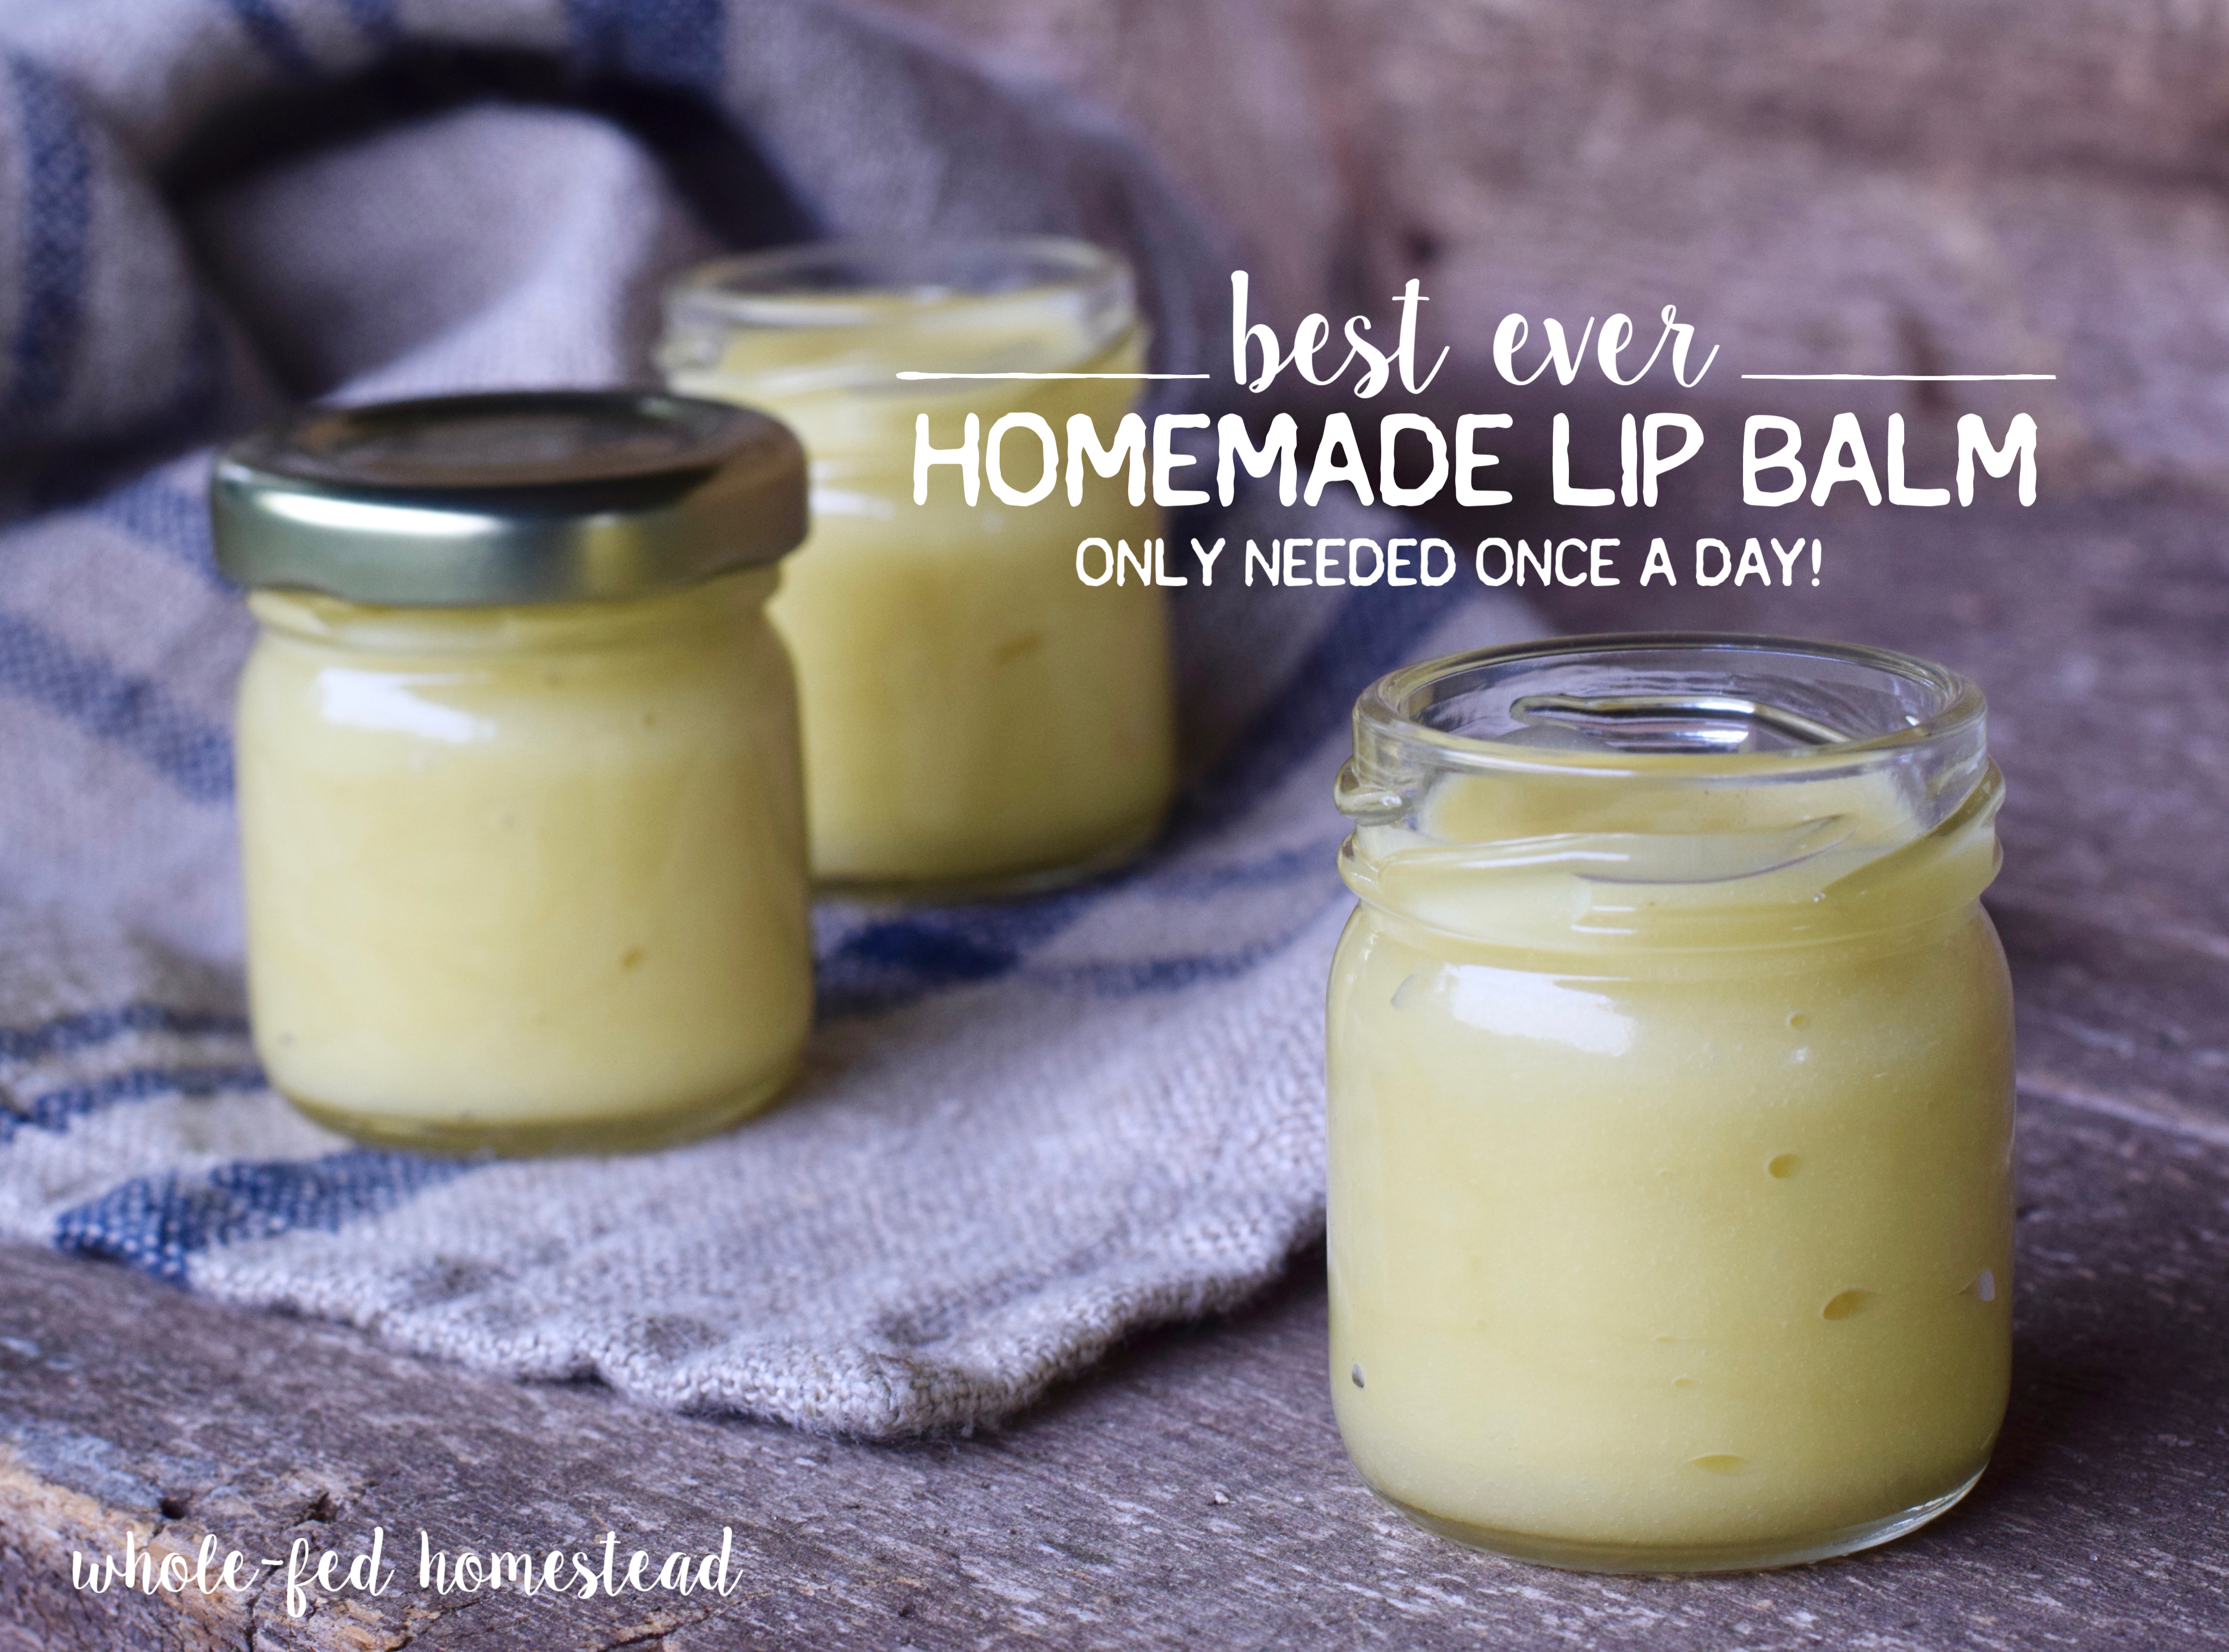
Every year when the weather turns cool (the start of chapped lip season!) I make a new batch of homemade lip balm. It always ends up slightly different, but it’s always the best lip balm I’ve ever used. Homemade is best and nothing store-bought can even compare!
My goal when I set out to make homemade lip balm was to create a recipe that was SO hydrating and nourishing that I only needed to use it one time a day, or twice at the most on really cold days or when I’d been outside a lot. AND I’VE DONE IT! I keep this by my bed, and put on a thick layer before falling asleep- and that’s all I need. No reapplying chapstick all day long!
This is the same lip balm recipe featured in Mother Earth News Magazine Winter 2018 edition! You all have been asking for it since they posted a photo of it from my Instagram feed last year. And here it is! You’ll find the recipe in the magazine, as well as here- where I have also added links to my favorite products and given additional information about ingredients and technique. I hope you love it as much as I do!
Tips for Making Homemade Lip Balm
One thing to keep in mind: the ingredients we’ll be using aren’t really regulated, so it’s important to know what you’re getting, and who you are getting it from. Since this will be going on your lips and you’ll essentially be eating it, make sure you use food-grade or cosmetic-grade ingredients!
My motto for making lip balm is the more ingredients the merrier! I see a lot of “easy” lip balm recipes out there with only one or two types of oils, often just coconut oil and beeswax… and honestly, I think those are poor lip balms. Each type of fat has unique benefits for your skin, so using many different fats yields a well-rounded, healing, and nourishing lip balm that will protect your lips all day long.
I’ve tested and tweaked my lip balm recipe many times over the years, and have finally landed on this one as my absolute favorite! While you can make substitutions, I think you’d be really surprised at how such a little ingredient change can affect the end product. If you want THE BEST, make the recipe as written- trust me.

By the way, this homemade lip balm also makes an EXCELLENT chapped skin cream- just leave out the honey, otherwise it will make your skin sticky.
A word about containers: This lip balm belongs in a jar or pot, not a stick- it’s not solid enough for that. I love these one-ounce mini honey jars because they are adorable. The lids on these jars aren’t wildly secure, so if you intend to carry this in your purse, go for the one-ounce glass jars with the metal screw-on lids. And definitely go with clear glass, so you can see the lovely product inside! For a smaller quantity I really like the half-ounce simple metal screw-top tins– these are a great gifting size, and are less expensive than glass. These quarter-ounce slide top metal tins are incredibly charming as well!
Don’t forget, homemade lip balm makes an amazing gift, especially around the holidays!
About the Ingredients
Beeswax – where to buy| Beeswax helps to create a barrier, locking moisture in to your lips. It also helps texturally to balance out the oils in the homemade lip balm and gives the finished product a good consistency. Beeswax is known to accumulate pesticides over time (the bees bring them back to the hive) so I recommend using organic beeswax.
Cocoa Butter – where to buy | I love that natural cocoa butter gives the finished lip balm a very light cocoa scent, not overpowering of chocolate, and smells a bit like something delicious is baking in the oven! It’s wonderfully pleasant. Cocoa butter contains oleic, palmitic, and stearic acids, all of which nourish the skin. Make sure your cocoa butter is unrefined, non-deodorized, and food-grade.
Coconut Oil – where to buy | The benefits of coconut oil are far and wide- I don’t think I have to convince anyone of that! Coconut oil is a great all-around moisturizer, and its great in lip balm. Just use whatever kind you keep at home for cooking.
Shea Butter – where to buy | One of my favorite ingredients in this homemade lip balm, shea butter is so creamy, buttery, luxurious, and rich! It has anti-inflammatory properties, and even has a history of medicinal use treating wounds and skin conditions. I prefer ivory shea butter over yellow shea butter. The yellow tends to have a medicinal type scent that I believe comes from the tree branches and roots it is boiled with to achieve the yellow color. You can use either color and the homemade lip balm will still turn out great! Just make sure your shea is raw and unrefined, otherwise it likely contains harmful chemicals.
Almond Oil – where to buy | Full of vitamins E and A, this oil is said to be protective against UV radiation. It is also especially good at penetrating and soaking in to your skin. Use sweet almond oil (which is mostly what you find for sale anyways), not bitter almond oil. Look for almond oil that is cold-pressed, or the very least hexane-free.
Extra-Virgin Olive Oil – where to buy | Good quality olive oil contains loads of antioxidants, plus an ingredient called squalene, which is very hydrating as it helps lubricate and protect skin cells. Olive oil has been used in skin care products for thousands of years! A lot of olive oils (like many found at your local supermarket) aren’t pure, so make sure you get yours from a reputable brand who will guarantee it is not cut with lesser quality oils.
Lanolin – where to buy | Every time I leave this out of my lip balm, I deeply regret it. Lanolin comes from sheep, and it is often used in nipple creams for breastfeeding mothers because it is amazingly healing. It’s one of my favorite ingredients in this lip balm! There are several brands of lanolin labeled “not for skincare use,” so make sure yours is cosmetic or food-grade!
Honey – source locally or try this one | I love adding a touch of raw honey to lip balm because it is an ultra-soothing, hydrating, miracle-working ingredient for your skin, and it’s perfect for chapped lips!
Homemade Lip Balm Recipe
This recipe makes approximately 4.5 ounces of finished product. And about 1.5 ounces lasts me almost the entire year, at a rate of using it generously once per day. Feel free to scale up if you want to make more!
If you use fresh ingredients, this lip balm should be good for up to 2 years!
Ingredients
1 Tbs beeswax
2 Tbs cocoa butter
1 Tbs coconut oil
1 Tbs shea butter
2 Tbs almond oil
1 Tbs extra-virgin olive oil
1 Tbs lanolin
2 tsp raw liquid honey
Equipment
-small heat-safe glass container like a Mason jar or Pyrex measuring cup (a pour spout is nice)
-small to medium-size pot
-kitchen fork
-containers to hold the finished lip balm
Instructions
1. If your beeswax is in a block, carefully use a knife to shave off small pieces; make sure to pack them down into the measuring spoon to get an accurate measurement. If using beeswax pastilles, measure a scant tablespoon. Place the beeswax, cocoa butter, coconut oil, and shea butter into the heat-safe glass container.
2. Place the glass container into a pot of water, so that the water comes about half-way up the side of the container. Place the pot on the stove over medium heat, and keep the water at no more than a gentle simmer.
Stir occasionally with a fork to help break up larger pieces. It should take about 5 to 10 minutes for everything to melt and combine.
3. After all of the beeswax pieces are melted, stir in the almond oil, olive oil, and lanolin; allow the mixture to heat for one more minute. Stir well to make sure everything is combined.

4. Using an oven mitt, remove the glass container from the pan and place it on a heat-safe surface; allow to completely cool and solidify, at least 2 hours.
Tip: if you get to this point and your lip balm is not a nice solid lip balm consistency, you might not have gotten the beeswax ratio correct. You can re-melt the product and add a bit more beeswax, then carry on. On the contrary, if it is too solid, re-melt and add a bit more of one of the liquid oils. Each batch will vary a little bit, and this recipe is overall quite forgiving. You shouldn’t need to re-melt and tweak unless you’ve really messed something up. :)
5. Use a fork to scrape and mix the lip balm around. It will go from a solid to a fairly liquid consistency- it’s a bit magical. Add in the liquid honey and use the fork to whip the balm; keep stirring for about a minute, until everything is well-combined.
Note: If your honey was crystallize and solid, you’ll want to liquify it. To do this, put the honey in a small glass container and warm it in a very gentle simmering water bath.
The secret to adding a decent amount of honey into a lip balm is to stir it in after the product is set. I have found that adding honey in with the ingredients when they are liquid will often cause the honey to separate out after the balm is solidified.
6. Find cute little jars or empty tins to store your homemade lip balm. It will go from loose and nearly liquid to solid again once it rests, so pour it into the containers right away while it is loose!
Slather it on your lips and be prepared for friends and family to ask if they can have some!
Please note: if you use good quality raw honey, it will crystallize in your lip balm after a couple months. This is no problem whatsoever! It feels like little exfoliating beads when you apply the balm, and the crystals will melt quickly into your lips!
Want more from the homestead?


This post may contain affiliate links, which means that if you click through them and end up purchasing an item (any item, not necessarily the one I recommended even!) I may receive monetary or other compensation. The price you pay is unaffected by using this link, and buying stuff you were going to get anyways through an affiliate link is a great way to support your favorite blogger and fellow homesteader! Thanks!


Do you sell your lip balm? If so, I’d like to buy some
I don’t sell it, no. Thanks for your interest though! -Crystal
Hi. I was looking on your blog the other day and saw a comment where you referenced a specific essential oil for ticks but now I can’t remember where it was on your site. Can you help? Thanks for your time!
You bet- that post is here: Natural Tick and Lyme Disease Prevention
Do you ever add essential oils like benzoin resin with either sweet Orange or manderine? Maybe I’ll make 2 batches to compare. Also I’m not a fan of Olive oil could I use jojoba or macadamia nut? I’m looking forward to making this…I’ve never used lanolin or honey before….thanks
You should be able to substitute any other liquid oil for the olive oil and have the recipe still work. I suspect that macadamia nut oil might go rancid quickly though, and shorten the shelf life of this lip balm. You can definitely add essentials oils if you like.
Any recommendations on a lanolin substitute?
Unfortunately, no- it’s one of the key ingredients. You could probably just leave it out and the balm would set up and turn out fine though.
I made this and it turned out great! Thanks for sharing. 😀
Found your post while searching lip balm DIYs on Pinterest and have to say this seems to be a great recipe. Will try it out as christmas presents for friends. Thanks a lot for sharing this ):
Question, will this work in lip tubes versus jars?
It’s definitely on the softer side and does best in jars.
This looks so good! What a great gif to make for friends or to enjoy yourself!
Thanks for sharing! Does I keep long?
Yes it does
Your lip balm looks wonderful! Thank you so much for posting the ingredients, especially for those of us who have critical allergies. I am deathly allergic to cocoa. It causes anaphylactic shock…so, it is a life-and-death allergy, of course. If I made this, I would have to substitute something else. Any suggestions? Thank you.
Yes, you could substitute any other solid fat… though the finished balm might be a little different texture and you might have to play around with the ratios.
Is it ok to use liquid Lanolin? Also how about more bees wax for a harder product that can go in a tube. Do you have any soap recipes?
Thanks in advance
You can definitely play around with the ratios depending on what you like. However, if you make a harder set lip balm in a tube you won’t be able to add the honey to it. And I do have a Rose and Lard Soap recipe here, yes!
Hi! This balm changed my life, thank tou ao much for sharing it! I’ve had super dry lips for a while and had to reapply my store bought ones like every hour or so to prevent that, and it didn’t even completely work! I spent a lot of money on the expensive ones too. But then I tried this formula and I only apply it like 2 or 3 times a day and my lips never game me a problem again! I gifted all my friends with little jars of this and they love it too.
I was wondering though, I’ve been getting a little fat bloom at the bottom after a month or so of usage. Maybe it’s just the changes in temperature but is there any way to avoid that? I don’t think it’s the honey that’s crystalizing.
Anyways thanks so much from Argentina! ♡
So glad to hear it was helpful! I’m not sure about the fat bloom, sorry.